
High-Quality Cardstock
Our custom card stock printing service allows you to create unique and personalized cards for any occasion. We offer 12pt and 24pt options. Read More

Uses for Card Stock:
- Greeting cards
- Invitations
- Business cards
- Postcards
- Brochures
- Flyers
- Posters
- Scrapbooking
- Book covers
- Gift tags
Q&A FAQ for Card Stock:
- What is card stock?
- Card stock is a type of paper that is thicker and sturdier than standard printer paper. It is commonly used for printing products that require a more durable material.
- What is the weight of card stock?
- The weight of card stock is measured in pounds (lb) and ranges from 50 lb to 110 lb. The higher the number, the thicker and heavier the card stock.
- Can I print on card stock with my home printer?
- Yes, most home printers are capable of printing on card stock. However, it's important to check your printer's specifications and settings to ensure it can handle the weight and thickness of the card stock you want to use.
- Can I use card stock for double-sided printing?
- Yes, card stock can be used for double-sided printing. However, some types of card stock may have a tendency to bleed through or smudge, so it's important to choose a high-quality card stock that is compatible with your printer.
- What is the best type of card stock for printing invitations?
- The best type of card stock for printing invitations depends on your personal preference and the design of your invitation. Some popular options include matte, glossy, and textured card stock, as well as metallic and glitter card stock for a more decorative look.
- Can I order custom card stock with my own design or logo?
- Yes, many printing companies offer custom card stock with the option to upload your own design or logo. This is a great option for businesses or individuals looking to create branded materials.
- What is the best way to store unused card stock?
- Unused card stock should be stored in a cool, dry place to prevent moisture and humidity from damaging the paper. It's best to store card stock flat or in a sturdy storage box to prevent bending or warping.
- Is card stock eco-friendly?
- The eco-friendliness of card stock depends on the type and source of the paper. Some card stock is made from recycled materials or sourced from sustainable forests, while others may have a larger environmental impact. It's important to check the specifications of the card stock you choose to ensure it aligns with your values and priorities.
- Can card stock be recycled?
- Yes, most card stock can be recycled. However, it's important to check your local recycling guidelines and ensure the card stock is free from any contaminants, such as adhesive or glitter, that could contaminate the recycling stream.
- What is the cost of card stock?
- The cost of card stock varies depending on the type, weight, and quantity. Generally, higher-quality card stock and larger quantities will be more expensive than standard printer paper. It's important to shop around and compare prices to find the best deal for your needs.

What is the difference between 12 point and 24 point card stock?
The difference between 12 point and 24 point card stock lies in the thickness and weight of the paper. Card stock is measured in points, which refers to the thickness of the paper in thousandths of an inch.
12 point card stock is thinner and lighter than 24 point card stock. It measures approximately 0.012 inches in thickness, which is similar to the thickness of a standard postcard. This makes 12 point card stock ideal for products that require a thinner, more flexible material, such as business cards or brochures. 12 point card stock is also easier to fold and may be more cost-effective than thicker options.
On the other hand, 24 point card stock is thicker and heavier than 12 point card stock. It measures approximately 0.024 inches in thickness, which is double the thickness of 12 point card stock. This makes 24 point card stock more durable and resistant to tearing or bending. It's ideal for products that require a more rigid material, such as book covers or business cards that need to stand up on their own.
When it comes to printing, the thickness of the card stock can affect the quality of the final product. Thicker card stock may be more difficult to print on and may require adjustments to the printer's settings or specialized equipment. Thinner card stock may be more prone to bending or curling during the printing process.
In general, the choice between 12 point and 24 point card stock depends on the specific needs and preferences of the project. If flexibility and cost-effectiveness are the priority, 12 point card stock may be the best option. If durability and rigidity are the priority, 24 point card stock may be the better choice. It's important to consider the thickness, weight, and printing requirements of the card stock to ensure the best results for the final product.
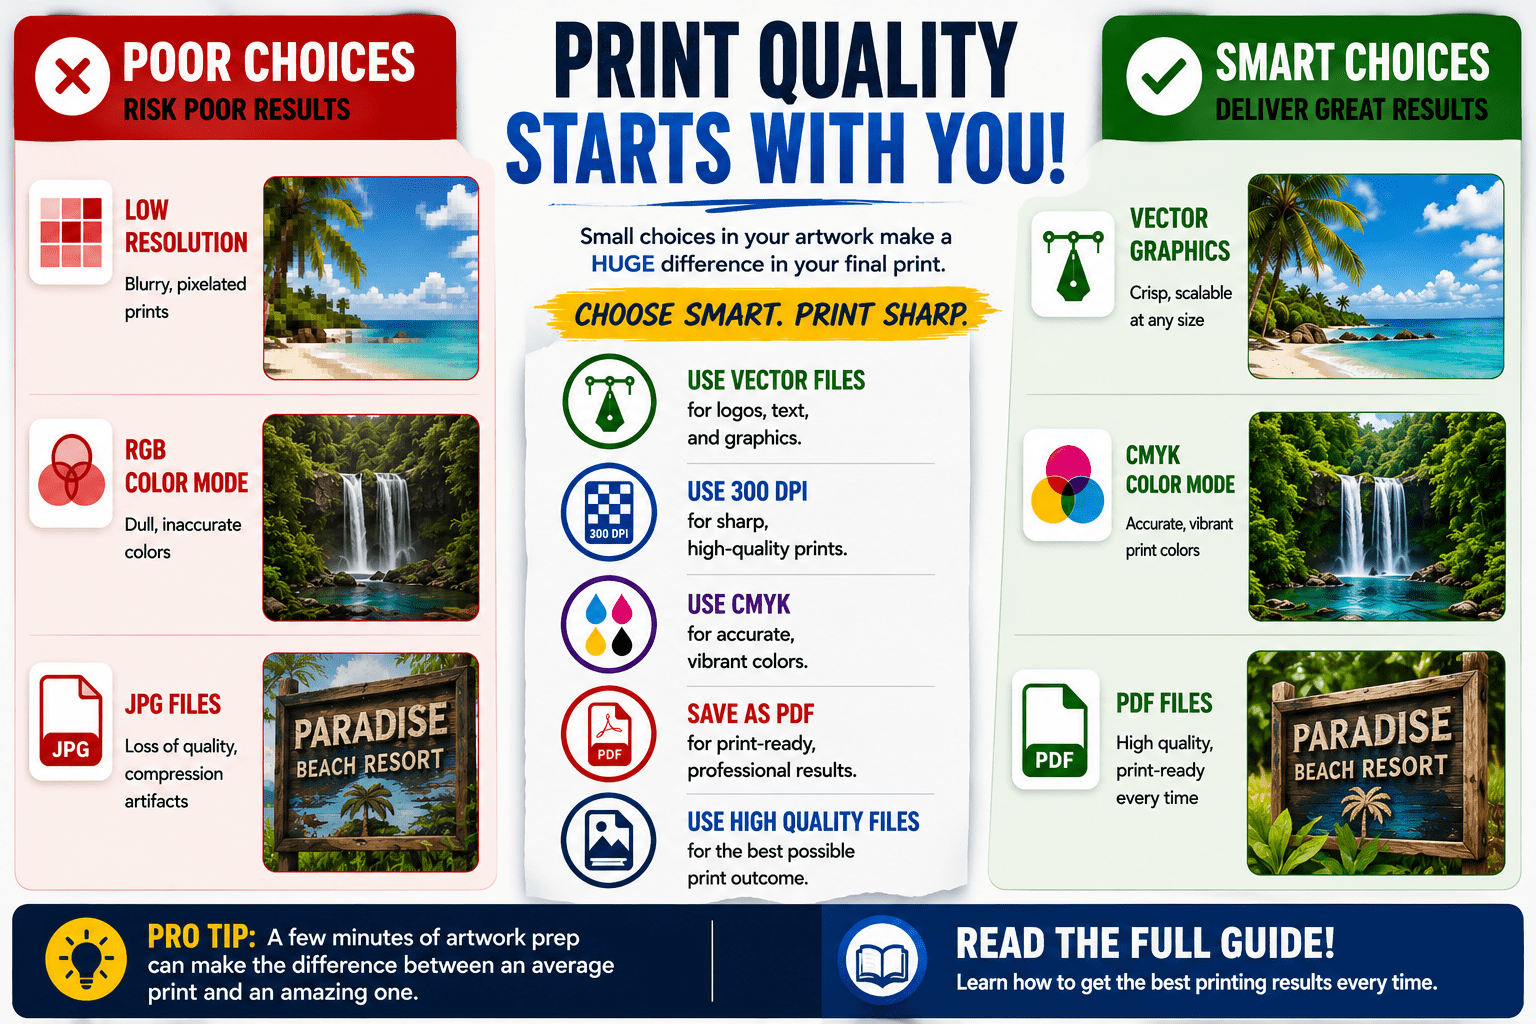
Everything You Need to Know Before Sending Artwork to Print
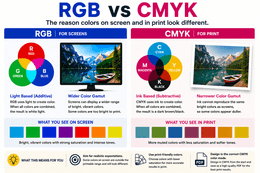
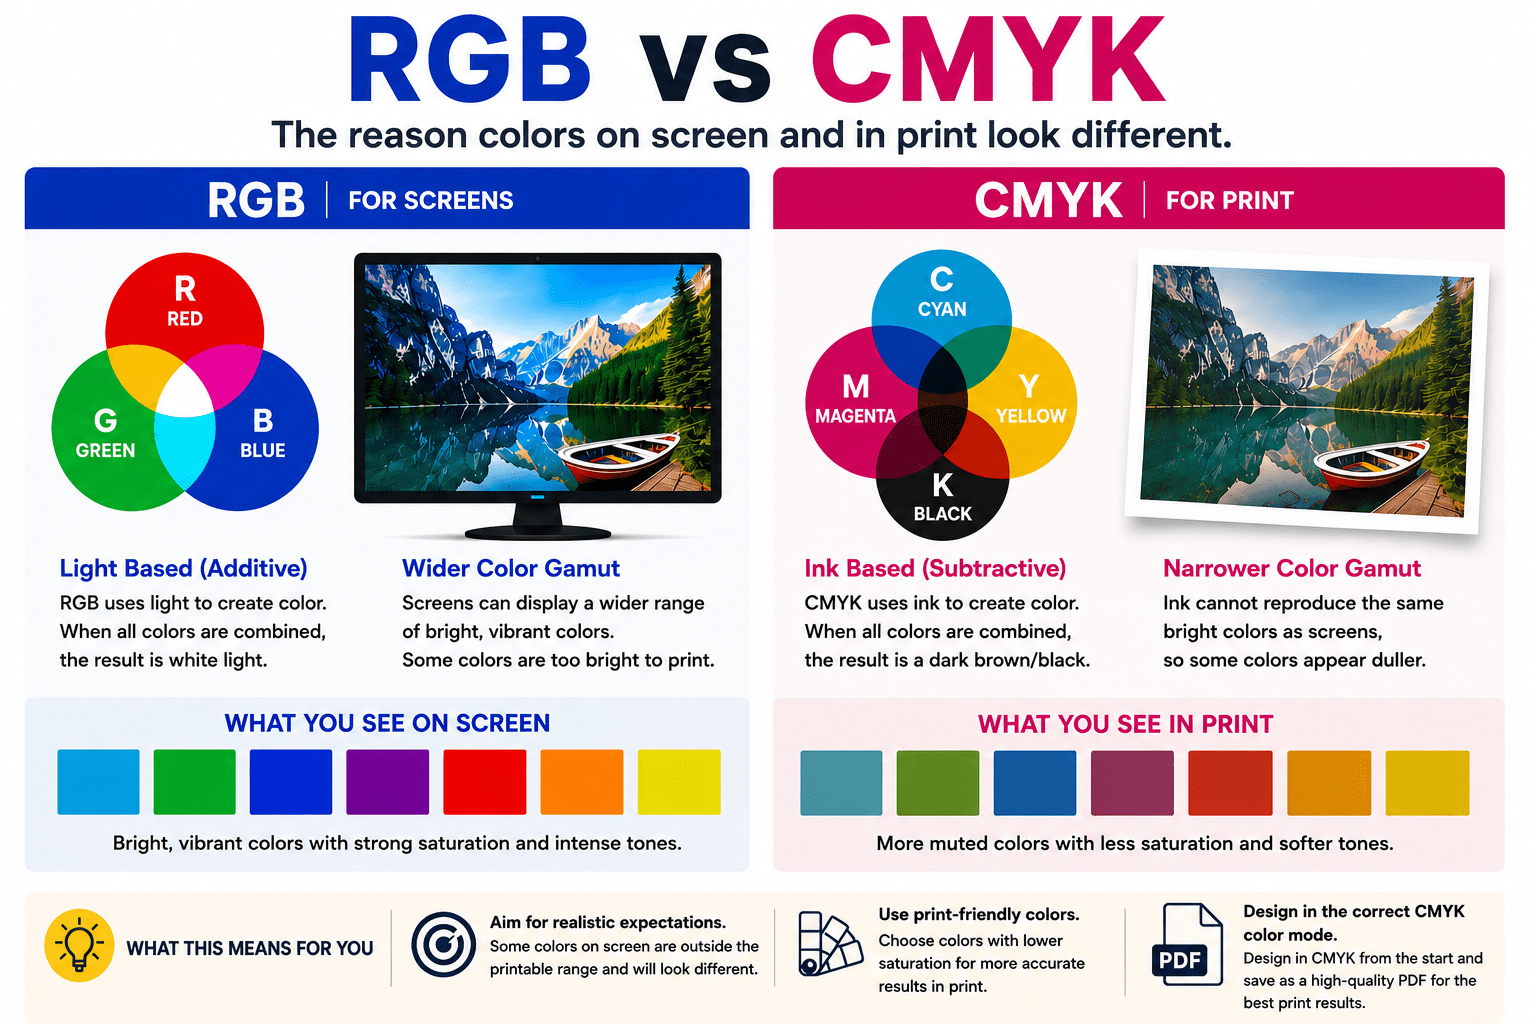
RGB vs. CMYK: Why Printed Colors Look Different Than Your Screen
One of the most common questions in printing is: “Why doesn’t my print look exactly like it does on my screen?”
The answer comes down to how color is created.
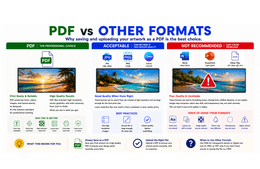
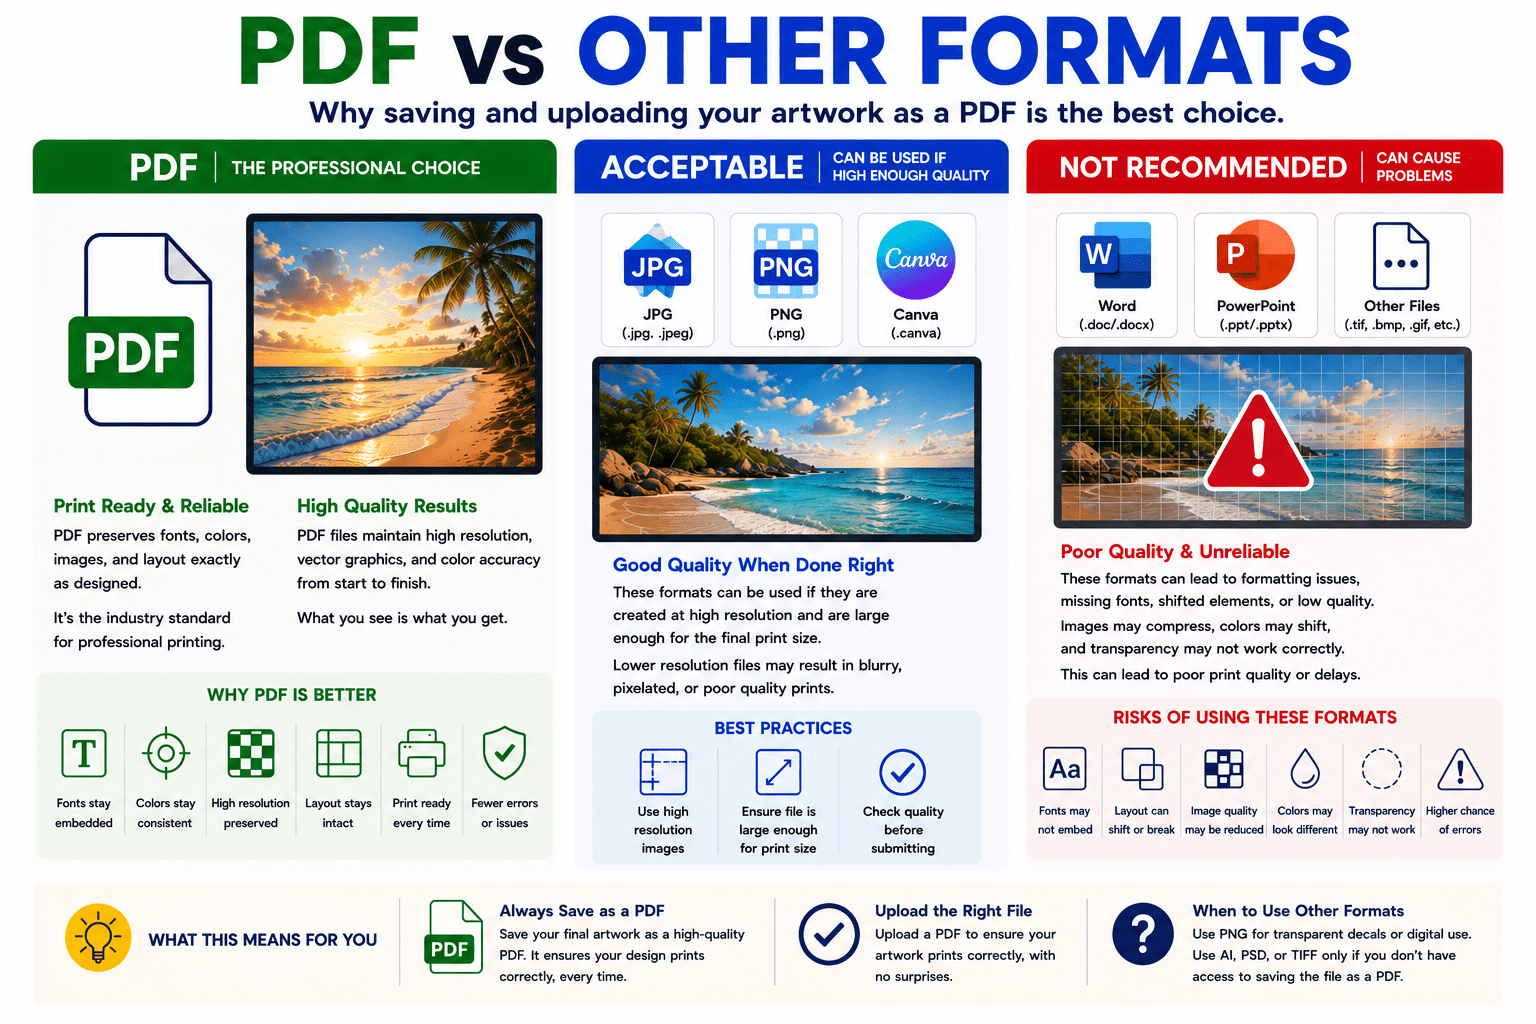
Adobe PDF vs Other File Formats: Why PDF Is the Best Choice for Print-Ready Artwork
One of the most common issues in the print industry starts before the printer is ever turned on.
It starts with the artwork file itself.
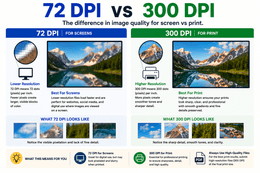
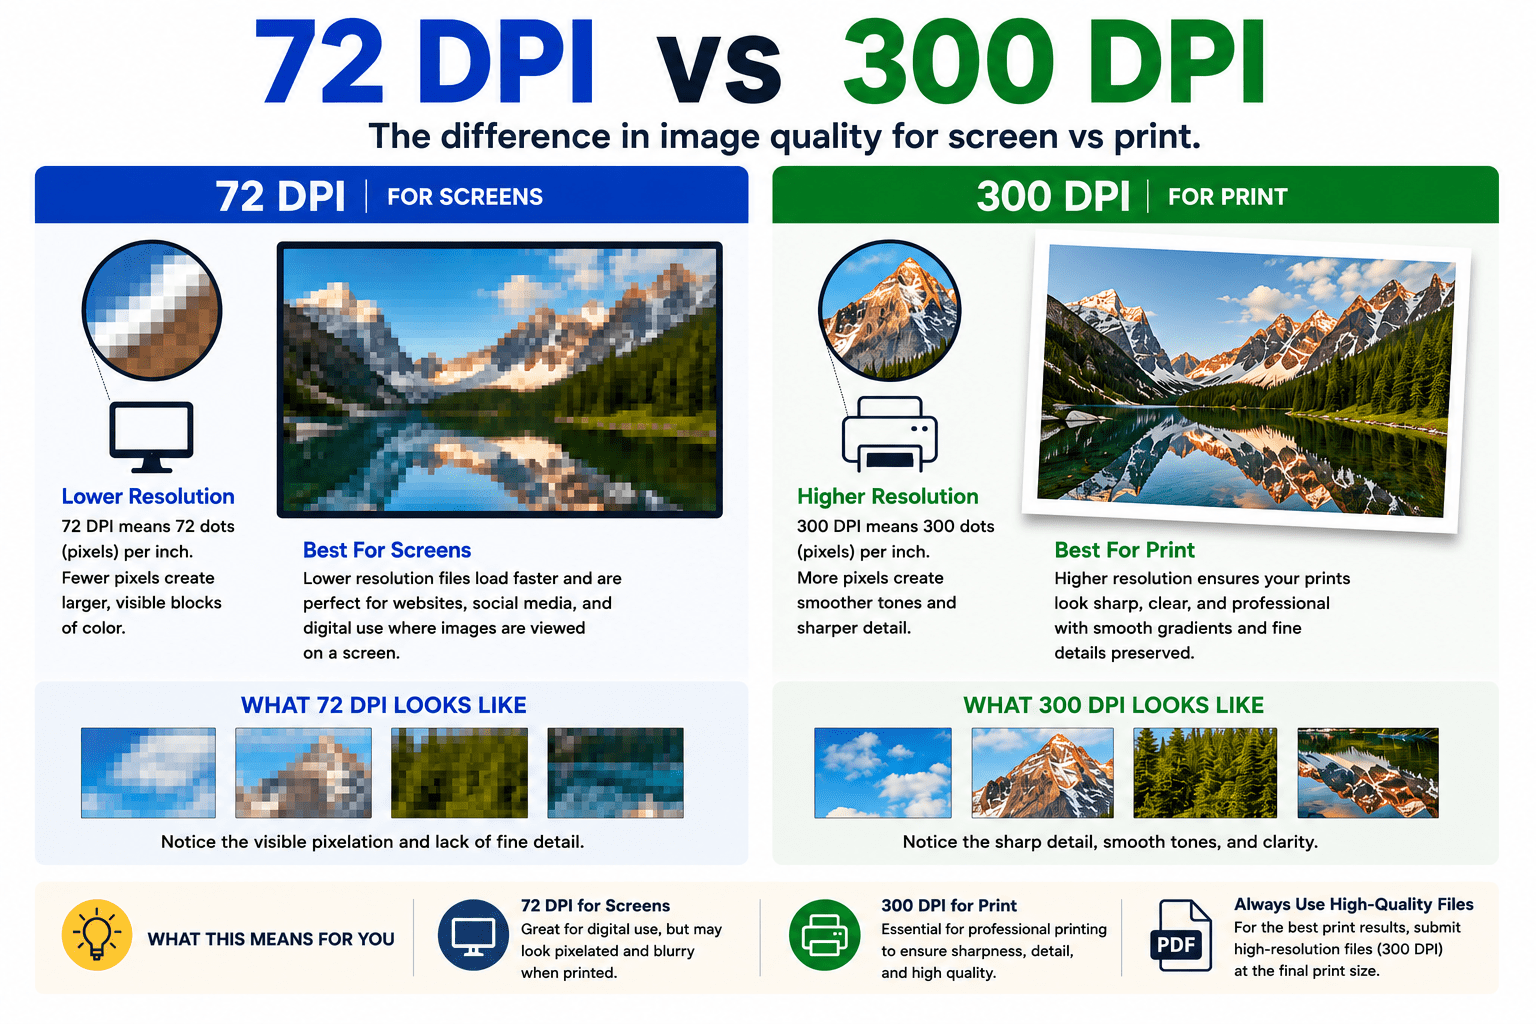
72 DPI vs. 300 DPI: Why Resolution Matters in Print
One of the biggest mistakes people make when preparing artwork for print is assuming that if an image looks good on a screen, it will automatically print clearly at a large size.
Unfortunately, that is not how image resolution works.
Select One Of Our FREE Templates Below To Get Started! All Templates are Completely Customizable!
Change the size of the product, colors, fonts, text size, add images, logos, etc. You can even change to a different template while still in the Design Tool! Upload your own images or use any of our thousands of FREE Stock Images! Make sure to click on LOAD MORE below to see more templates! If you need a custom shape, custom grommet placement, or any other custom cuts, please email us directly at printsignsquick@gmail.com or call us at 951-595-7653


Create your product Artwork before placing your order using our free design tool!
Click on the 'Free Design Tool' link and select your product from the drop down list. You'll be directed to our Design Tool page where you can start designing your own artwork. Upload your own photos or select any of our free stock photos. Add text, clip art, layers, change colors, fonts, size, finishing options and so much more!
YOU MAY ALSO LIKE
Customer Reviews!
I would order from Print Signs Quick again!

I Absolutely LOVE My New decals!
I absolutely LOVE my new decals! Someone posted in our "Hiking with Dogs" Facebook group about the great decals this seller was producing and so many of us jumped on the band wagon that I think we overwhelmed her a little bit. She came through for us all and everyone that posted what decal they got in our group didn't have anything but praise and excitement at what they received. A+ Seller and Awesome product. Don't see exactly what you want? Send a note and the seller will send you examples of what you might be looking for. Again, cannot say enough about how happy I am with my purchase.
Excellent!!!
Excellent!!! So impressed with the communication this seller provided, the final product looks amazing! Love the banner!!
Super customer service and perfect floor drop!
Super customer service and perfect floor drop!
Makes all of my products look great when photographed!
Shipped on time
Shipped on time. Slightly heavier vinyl than I expected so that's awesome
Excellent customer service!
Excellent customer service, quick shipping, exactly as I desired. This was a fabulous addition to my shop, and has greatly improved my photos. A ginormous thank you for what you do!
Backdrop, artwork and customer service were excellent!
Backdrop, artwork and customer service were excellent... unfortunately UPS damaged the item during the deliver process to Canada. Seller handled the situation very well.
Most Recent Articles
72 DPI vs. 300 DPI: Why Resolution Matters in Print
One of the biggest mistakes people make when preparing artwork for print is assuming that if an image looks good on a screen, it will automatically print clearly at a large size. A file that appears perfectly sharp on a phone, social media post, or website can quickly become blurry, pixelated, or soft once it is enlarged for printing. That is where DPI comes in.
RGB vs. CMYK: Why Printed Colors Look Different Than Your Screen
Screens use RGB color, which stands for Red, Green, and Blue. Phones, tablets, TVs, and computer monitors create color using light. Because screens are backlit, colors often appear brighter, more vibrant, and more saturated. Printing uses CMYK, which stands for Cyan, Magenta, Yellow, and Black. Instead of using light, printers create color using ink on a physical material. Printed graphics rely on surrounding light to reflect color back to your eyes.


Frequently asked Questions
Notify on stock availability